Guest Post {Silhouette Invitation}

I am thrilled to be sharing a guest post with you from Cristen of Sassy and Chic. She WON a custom designed party by THE Kate Landers!!!! Can anyone say JEALOUS???? You can check out all the details of the incredible party on her site. We are privileged to get a tutorial of the adorable invitation.
Without any further adieu...

carriefayphotography.com
Cristen says...
This Vintage Silhouette Party was so much fun to create. In creating this party with Kate Landers, she gave me the advice to take one design element and continue it throughout the party. Great advice that translates perfectly to any party theme!

I chose to go with 2 main elements: Silhouette and Doilies
You'll see these 2 items used throughout the entire party. One or the other or both is used in nearly every aspect along with the color scheme of  light blue and peach.
It made for a very cohesive, beautiful look when all was said and done.

The Invitations:
The invitation sets the tone for the entire party. It gives the guests a peek into what they can expect at the event. I knew I wanted to incorporate both the main elements.

STEP 1: After a few trials and errors the invites came together. I used a simple light blue paisley scrapbook paper that I cut into 5x7 rectangles for the base.
STEP 2: I then printed the invitation wording onto 8 1/2 x 11 sheets of light blue cardstock. I then cut them into 4x6 sizes to allow the border to still be seen.
STEP 3: I changed the coloring of Savannah's silhouette (created by Yes'm Creative on Etsy) to a light blue and printed it onto a sheet of velum. I cut these into 4x6 sizes as well.
STEP 4: The fun part - putting it all together! I laid the blue cardstock and velum together on top of the 5x7 paisley and once I got it where I wanted it, I punched 2 holes about an inch apart.
STEP 5: I slipped 7/8" blue satin ribbon through both the holes on top so only a solid strip was showing. I didn't want anything to fancy here.
STEP 6: I laid the invitation on a 12" doily and cut the bottom and top of the doily so it only stuck out on the sides. I centered the invite on the doily and wrapped the 2 sides of the doily around the invite so they overlaped just slightly.
STEP 7: Another idea I took from Kate was to add some type of ribbon around the invite like it was a little present. I love any excuse to use a bow and ribbon so I was in. I think it really gave the invite that final touch it needed.
Fabulous, huh? Thank you for sharing Cristen!
Don't forget to enter the giveaway going on at Cravings!

linking with: Craftomaniac, Skip to My Lou, Creative Girl, Type A, DIY Showoff

Read more...

Butterfly Mobile Tutorial

How to Make Butterfly Mobiles

Here is a tutorial for the mobiles I created for Avery's Vintage Butterfly Ball. 
Supplies:
Wreath - mine was a 12" from The Dollar tree
Fishing Line
Ribbon
Tulle
Greenery
Scissors
Die Cut Shapes in various sizes
Double Sided Tape or Glue Dots
All instructions and measurements will be for a 12" wreath
Step 1:
Wrap wreath with greenery (18") and ribbon (60") as desired. 
Step 2:
Cut 32 small die cut butterflies
Cut 32 medium die cut butterflies
(If you don't have a die cut machine you can trace shapes using cookie cutters or print a shape from microsoft clipart.)
Cut 4 strands of 22" long fishing line
Using double sided tape or glue dots stick coordinating front and back of each shaped butterfly to the 22" long strand of fishing wire.  Start your top set of butterflies 5" from the top. Alternate one small set with one medium set or whatever pattern you choose. I used 2 sets of each size on a strand. 
Only place glue in the "body" portion of the butterfly so that you can separate the wings into 3-D form. You will create 4 strands.
Step 3:
Cut 24 pieces of tulle. 20" long and 5" wide
Using 3 pieces of tulle I made 8 mini poms using the accordion fold tissue paper pom technique. But I have since discovered there are easier ways to make them as shown on Once Wed. 
Lesson learned for next time!
Step 4:
Tie 2 poms to a 18" strand of fishing line leaving space in between to tie a coordinating bow. Also leave 3-5" of space from the top so you have room to tie the strand onto the wreath. You will create 4 strands. 
Step 5: 
Tie your four strands with butterflies and your four strands with poms around the wreath. I alternated the strands and tied at various heights. Trim the fishing line at the top. 
Step 6:
Cut 4 strands of ribbon at 24" length to tie onto the wreath for hanging. Tie each ribbon onto the wreath...space evenly.
Step 7:
This is where it gets a bit tricky for me. Grab all four of the ribbons you just tied on and gather them together above the wreath. The wreath will be hanging below you. 
Tie those four ribbons in a knot at the top once you have it balanced where all sides are hanging even. I have to stand to do this and I find an extra set of eyes is  helpful to make sure I have all sides even. 
Step 8:
Hang from the ceiling with a hook or I simply used a push pin since I knew it would be coming down in a few hours. 
Enjoy! I am happy to help with any questions. So many possibilities with Easter right around the corner. 

Linking with: Craftomaniac, The Creative Girl, Type A, Skip to My Lou, DIY Showoff

Tuesday To Do Party

Read more...

Paper Flower Tutorial

Just in case you missed the guest post I did for Amanda at My Heart's Desire here is the tutorial on the fanned flowers I made for Avery's butterfly party.
 I had seen them in pictures but had never seen a tutorial so I just played till I figured out what worked for me. 
Fanned Paper Flower Tutorial
Supplies:
5-6 sheets of various colors and patterns of cardstock
Double stick tape
Punches, die cut machine, measuring cups, or cookie cutters
Glue Gun and glue sticks
Glue stick
Bamboo skewer or small dowel
Ribbon to wrap skewer (optional)
8 simple steps and you will be in flower city!

Step 1:
Cut 12x12 card stock in 4 strips at any desired width depending on the size flower you want. Mine are 4" in strips. If you use 8x10 sized cardstock you may need an additional strip. 
P.S. - I had to make this late at night so I apologize ahead of time for the flash photography going on. 

Step 2:
Fold your four strips into fans
Step 3:
Double stick tape the ends of your folded strips. You will end up with a long line as seen below. 
Step 4:
Bring your two ends together in a circle formation. Use double stick tape to secure. At this point your circle will probably flip up on you or might be a bit difficult to mange. Have no fear the fix is coming!
Step 5: 
Flip your circle to what you want to be the backside. Place glue from your glue gun on a circle punch or a square of card stock and use this to stabilize the "flower". One hand holds the circle with the glue and the other is pushing your folded paper circle tight. The inside circle should all be touching each other. You will need to hold your circle/glue there till you feel like it is on the dry side. 
At this point I need to interrupt this regularly scheduled tutorial with a MISTAKE!
When I flipped my flower back over and started to adorn the front side it wasn't working right. It was floppy. I went back to my original flowers and realized I had used all cardstock. The 12x12 paper I had used for this project wasn't cutting it. So I headed back to my paper drawer and grabbed bright colored cardstock. I repeated the above steps to get to Step 6. Hope this doesn't only happen to me! 
Step 6:
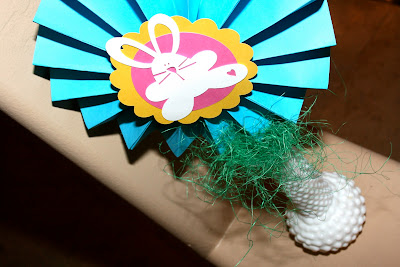
Adorn the front of your flowers any way you please!
In the original flowers for Avery's party I simply used various sized punches of coordinating patterns in the palate and then added a center button. It worked well for a vintage theme. 
For this flower I was going for Spring, bright and festive. I played with the the items you see around the flower and picked what you see in the picture. So many options! So many flowers to make! My Cricut and Silhouette were used for the below shapes but you could use a cookie cutter or measuring cup as your template to achieve any look you wanted. 
Step 7:
Glue a bamboo skewer to the back side of your flower. If you want to cover the skewer you can wrap it in any form of ribbon. I used green raffia for the ones seen in Avery's party. 
Step 8:
Place in the vase of your choice. I also think this one would be adorable hanging from ribbon. 
Soooo many possibilities! Easter, Fourth of July, Baby Shower, the list goes on and on.
Step 9:
ENJOY! 
If you make some I would love to see pictures!
P.S. - I always like to know how long crafts are going to take me. The 24 I made for the Butterfly Party took me a bit over 5 hours. It was some good TV watching! Hope that helps. 
Pure Joy Events Party Tutorial Contest

Read more...

Meet Amanda Brown

This is my new friend from the blogging world. Amanda Brown. 
We are gonna be roomies at the Relevant Conference in October. 
Can't wait for the conference 
and can't wait to meet Amanda in person. 
I am guest posting on her blog today! 
Several of you asked how I made the paper flowers from Avery's party and now you can get the How To 
on Amanda's fabulous blog My Heart's Desire
Check it out...peek around
 and stay awhile over at My Heart's Desire. 

Read more...

crepe paper rosesttes

I am in the midst of decorating for Avery's first birthday party.

I am attempting to make a garden of flowers through various items I already have.
This week: boring ole crepe paper!
Who knew?

Here is a great tutorial on how to make these. I straight pinned them on a styrofoam ball and then added some "pearls" from a necklace that had broken.
It took one episode of Desperate Housewives to complete. :)
I time my crafts via TV shows.

linking with: Craftomanic, DIY Showoff & Creative Girl, Tip Junkie

Read more...

Master bedroom makeover FINALLY!

I can say with confidence that I love MOST of the rooms in my house. Sure, there are minor tweaks I would make here and there but what fun would it be to have everything perfect? I can also say with confidence that I have not LOVE LOVED my own bedroom since leaving my floor to ceiling Laura Ashley Castleberry room in my parents house. That was 1992. That is ALMOST 20 years ago people! Eric and I married 4 years ago and had a mis-mash of furniture. Light, dark, antiques, contemporary...there was so much confusion. Before we could fix the problem baby one was on the way and we needed to invest in him not us. Then baby two was on the way and we needed to invest in her not us. Well this year we invested in US and it was so worth it. We went from a room that neither of us would have chosen to hang out in to a room that you have to force us to leave. Eric will be the first to say that he had no idea how great a room can feel when it becomes something you LOVE! 
After turning our former bedspread into our headboard, inheriting an antique from my parents, a trip to TJ Maxx and downtown Glendale's antique district we have a room. Without further adieu our new room: 
BEFORE
AFTER

FORMER BED SPREAD
BECOMES A HEADBOARD

ANTIQUE RADIO FROM MOM AND DAD
MR BAILEY'S SIDE
MY SIDE...notice my dream BIG angel
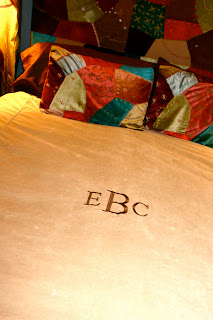
THE NEW BED SPREAD WITH OUR MARRIED MONOGRAM.
ON SALE FROM POTTERY BARN. 
Gotta go. My room calls. 


Linking with: diy showoff, craftomaniac, Tip Junkie, A Beach Cottage


Read more...